Saturday, August 21, 2010

Flower Pins

Last fall I purchased a couple of silk flower hair clips.  For like $7 a piece.  I used them in my hair, on the lapels of jackets, as a pin to hold the ends of my scarf together, and as a decoration on my purse.  And then it occurred to me that I can actually make these things myself.  For like $0.07 a pice.

Supplies:
- Fake flowers.  I like silk ones, but anything that isn't too stiff would work equally well.
- Hair clip or button pin thingy.  I've used about 5 different types, so play with some and see what you like best.
- Beads (for the center of the flower).
- Wire for attaching the flower to the clips.
- Felt for covering the back of the pin.

Tools:
- Hot glue gun and glue
- Scissors

Directions:
- Pull the fake flowers off the stems.
- Thread a bead onto a piece of wire and fold the wire in half (so that the bead stays on).
- Thread wire through the center of the flower petals.  Play with different color combinations and styles.
- Thread the wire around the pin or clip.  Different clips will require different methods of attaching.
- Cut the felt into small ovals or circles, in a size that will fit onto the back of the clip/pin.  I use zig-zag shears.
- Cut a slit in the felt to slide the clip through, and then place onto the clip.  So you have, in this order: bead, flower petals, clip/pin, felt.
- Hot-glue inbetween the flower and felt, which will then secure the clip in between the two.
- Let dry and now you have a beautiful, and cheap, flower pin!

Here's my Mom wearing one of my creations on her dress for my brother's wedding:

Friday, August 20, 2010

Framed Jewelry Holder

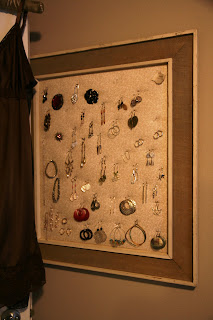
I am blessed with lots of cute earrings, but plagued with no good organizing system for them. So I crafted this awesome jewelry holder from an old picture frame and a few supplies from the local craft store.  I love it so much that I got up in the middle of the night and turned the light on just to look at it again.  But I'm neurotic like that.

Purchased supplies:
Picture frame (minus the glass) - $15 at my local antique shop
Foam board - $3
Batting - $4
Fabric - $3
Push pins - $3
Total cost = $28 (with batting, fabric, and pins left over)

Other tools you'll need:
Scissors
Hot glue gun, glue
Something to secure the board to the frame
Lots of cute earrings to hang up!

Steps:
1) Remove glass and backing board from your frame.
2) Cut the foam board to fit inside the frame.  Leave a little extra space to account for the batting and fabric that will be wrapped around the edges.

3) Cut the batting and fabric to the size of the foam board, leaving 1-2 inches around the edges.  Washing and ironing the fabric gives the best results, but I'm lazy, so I just ironed it.
4) Starting with one edge at a time, hot glue the batting and fabric to the edges of the foam board.  Make sure you have the fabric facing the correct direction.  Not that I've ever done it wrong...
5) Admire your work.
6) Place the covered board inside the frame.  Secure it to the frame.  My piece was old and didn't have any clasps on the back that most modern-day frames come with.  So I used a handful of screws to keep it in place.
7) Admire your work again.
8) Hang on the wall.  Push the pins randomly on the board and hang up your beautiful jewelry.  Voila!

Thursday, August 19, 2010

Homemade Dill Pickles

This recipe has been used by my great-Grandmother, my Grandmother, my Mother, and now us.  I really hope they don't mind me posting it to the interwebs, but it's so simple and easy that I feel compelled to share.

We hot-pack our cucumbers instead of actually canning them.  It's easier, faster, and less cleanup.  And almost every single jar seals properly.  I suppose they won't keep quite as long as if we canned them, but they still last a couple of years.  And maybe more than that, but it's rare that they hang around for more than 6 months without being eaten.

[Quick side story...  The first year Ken and I got into canning, we made pickles, peaches, peach jam, applesauce, pearsauce, apple butter, pear butter, and brandied pears.  All with the intent of making gift baskets for Christmas.  However, once he tasted the yumminess of the pickles, he was horribly upset that we were giving them all away.  I mean, really upset.  So now we make plenty every year to both give away and horde for ourselves.]

Ingredients:
- Cucumbers.  We usually buy 2-3 bags, which are 10 lb each.  2 bags makes about 30 quart jars.
- Alum.  It's a white powder in the spice section.  Not to be confused with Anthrax.
- 3-4 clusters of garlic.
- 2 bunches of dill.
- 1 bag of dried Mexican red peppers.  I've used different kinds and they all seem to work fine.
- 2+ jugs of cider vinegar.
- 1 big container of unioidized salt.  NO iodine!

Supplies:
- Jars, screw tops, and lids.
- Big pot to make the brine.
- Small pot to sanitize the lids.
- Tongs/forks (to fetch the scalding hot lids from the boiling water).
- Big towels/rags.

Instructions:
1) Start off with clean, sanitized mason jars.  Wide-mouth only.  The quart and half-gallon sizes work best.  The dishwasher works well for sanitizing.  If you use still-hot jars, even better.

2) Make the brine and keep near-boiling on the stove.  Combine 3 qt water, 1 qt vinegar, 1 c salt.

3) While the brine is heating up, clean all of the cukes.  Sometimes they have spiky things on them and it's best to scrub them off.  Also, pull the blossom end off.   I remember my Grandma and Mom would put them all in the washing machine on the delicate cycle (skip the spin cycle!!!).  I think I also tried it once and it worked well.  But for smaller batches, it's easy enough to clean them in the sink.
4) Put the lids in boiling water to sanitize.

5) In each sanitized jar, put: 1/4 tsp alum, 2 cloves garlic (peeled and cut in half), 1 head of dill, 1-2 peppers.
6) Stuff as many cucumbers into each jar that will possibly fit.  This is the first year that I cut some up into spears, slices, and rounds.  But only a few jars in case it doesn't turn out.  I'll post an update when we open them up!
7) Pour the hot brine into each jar almost to the top.

8) Place a scalding hot sanitized lid onto each jar and screw shut.

9) Turn each jar upside down and cover with a big towel until they have cooled off (several hours).

10) Turn back right-side up.  Check to see that they have sealed.  And then use a wet cloth to wipe up all the spills and dried vinegar.  I usually put the jars that didn't "pop" into the fridge and eat those first.
The pickles should be ready to eat in a few weeks.  Although, prime eatin' time will take a few months.