Sunday, December 26, 2010

Beer Bread

My Mom used to make this for us, and as kids, it always seemed so cool to be eating something with alcohol in it.  Even though all of the alcohol evaporates during the cooking process.  It's the single easiest recipe I own, and goes well with wintry, hearty meals.  Roasts, stews, holiday feasts.  Or alone fresh out of the oven with butter melted onto it.  Mmmm...  We recently had a few slices of beer bread at a Portland restaurant and, oh ICK!  This version is so much better.  You can use any kind of beer, but the darker kinds have a lot more flavor.  Porters are the best.  IPAs turn out good results too.  I usually use the darkest homebrew that we have on tap.  And then pour a pint for myself to drink while it's baking.

Ingredients
12oz beer
2c self-rising flour (the "self-rising" kind of flour is very important)
3T sugar

Directions
- Mix the flour and sugar in a bowl.
-Pour the beer in slowly so that it doesn't foam up all over the place.
- Stir only until the flour is wet.  Don't over mix.  It should be lumpy and gooey.
- Pour into a greased bread pan.  Bake at 375° for about 45 minutes.  Enjoy!

Monday, December 20, 2010

The Anti Christmas Cookies Part 2 - Peanut Brittle

For reasons why I don't make Christmas cookies, and for instructions on making candied citrus slices, read here.  This year's addition to the holiday food giving tradition also included peanut brittle.  I have never made peanut brittle.  But it seemed simple enough.  And it really was!
 

Peanut Brittle
There are tons of easy recipes online, so I just went with the first one that turned up.  It's from allrecipes.com and uses real butter in the final step, creating a smooth (and somewhat greasy) final product.  The only modification I made was to use slightly less peanuts.  I think next time I will use a recipe that includes brown sugar and maybe eliminates or decreases the amount of butter.

Ingredients:
1c white sugar
1/2 c light corn syrup
1/4 t salt
1/4 c water
1 c peanuts (I used maybe 3/4 c)
2 T butter, softened
1 t baking soda

Materials:
2 quart saucepan
candy thermometer
cookie sheet

Directions:
1. Grease a large cookie sheet.  Set aside.
2. In a heavy 2 quart saucepan, over medium heat, bring to a boil sugar, corn syrup, salt, and water.  Stir in peanuts.  Put in candy thermometer and keep stirring until it reaches 300 degrees (about 10min maybe?). 
3. Remove from heat and immediately stir in butter and baking soda.  Pour immediately onto cookie sheet.  Use a spatula or a fork or something to gently spread and lift and pull the mixture in a rectangle about 14x12 inches.
4.  Let cool and then snap into pieces.

The Anti Christmas Cookies Part 1 - Candied Oranges

I was not blessed with cookie making skillz.  My last attempt was about 6 years ago and it ended at 3am with the counter tops covered in a brick-like material pretending to be cookie dough, runny frosting dripping down the cabinets, and me in a heap of tears on the kitchen floor thinking "but Mom made it look so easy".  Never again.

Enter holiday food gifts that I am capable of creating without injuring myself or others.  Pickles!  Jam!  Apple butter!  And new to the rotation this year, candied oranges and peanut brittle.

Candied Oranges
I coated half of each slice with melted chocolate and sprinkled with sparkling sugar.  But for a summertime batch I would probably just dust with the sugar, or simply leave the slices alone.  You could also combine in jars with candied grapefruit and lime slices.  Or use as garnishes for some sort of citrus martini.

Ingredients:
6-10 navel oranges (Or however many you wish to make.  I can only fit 2-3 per batch.)
4-5 cups white sugar
2 cups water
optional - melting chocolate
optional - sparkling sugar

Materials:
food dehydrator
wax paper

Directions:
- Cut the ends of the orange off, slice down the middle, and then cut each half into slices about 1/4-inch thick.
- Heat up the sugar and water until all of the sugar is dissolved.  Bring to a boil.
- Plunk in the oranges.  Boil for about 15 minutes.  Flip the slices over (gently) and boil for another 15 minutes.
- Reduce heat until everything is nicely simmering and cook for another 30 minutes.  Flip the slices over occasionally to make sure everything is evenly cooked and softened.
- Carefully remove the slices with tongs.  They will be very delicate and pull apart easily.
- Place on a rack to dry out a bit.  Don't place on paper towels.  You will have a papery sticky mess all over the oranges.  I ended up using a clean lint-free dishtowel with good results.
- Put onto food dehydrator trays and let the machine do it's magic at 130°F for 4-6 hours, depending on how wet the slices are when you put them in.

Optional (chocolate covering):
- Melt chocolate on the stove with a double boiler (or two pots stacked on top of each other with boiling water in the bottom one, and the chocolate in the top one).
- Dip each slice half way into the chocolate.  Place on wax paper.  Dust with sugar.
- Let the chocolate harden.

Sunday, October 24, 2010

Knit: Hat


This was meant to be a slouchy hat, but it is sort of in-between.  No matter to me, it's super cozy and I love the color (rather, the non-color).  Mushroom-grayish-brown is one of my new favorite non-colors.  And it's plenty long, so it covers my mass of crazy hair without me having to keep stretching it down.
 Supplies:
  • Worsted weight yarn - I used Rowan Cocoon 80% merino 20% kid mohair...I think.  I usually have multiple projects going on simultaneously and I'm notorious for losing and/or mixing up the yarn labels.  Regardless, pick a yarn that you like and use the measurements on the label to figure out how many stitches to fit your noggin.
  • Size 6 double point needles - Again...I think.  I measured my head and used the stitches/inch guide and the recommended needle size on the label.  You could probably use a circular needle, but I always work with dp needles, so I can't help you out there.
Instructions:
1) Cast on the desired number of stitches, taking care not to twist the needles.
2) Knit in single rib (k1, p1) until the piece measures about 1 inch.  If I knit this again, I would make it 2 inches.
3) Knit every row until the piece measures as long as you need it to be.  Mine ended up 10 inches.
4) Now the tricky part...  split your work evenly across 4 needles.  So, if you cast on 100 stitches, make sure you have 25 on each needle.
Needle 1 (w/ 25 stitches)
Needle 2 (w/ 25 stitches)                                             Needle 3 (w/ 25 stitches)
Needle 4 (w/ 25 stitches)
5) Bind off needle 1 and needle 4 together using a 3rd needle.  So, treat needle 1 and needle 4 as 1 needle, like you are knitting with 2 strings of yarn held together.  You will end up with yarn on 3 needles.
6) Now, just work with needle 2 back and forth, until it is 2 inches longer.
7) Bind off needle 2 and needle 3 together.
8) Weave in the ends, and wash/block.
Need help washing/blocking?  Fill a clean sink with lukewarm water and a few drops of Dreft detergent (It's gentle and smells soooo much better than Woolite.  Sort of like fresh babies.  Instead of wet dog.).  Gently push the hat through the soapy water, but don't twist or scrunch or ball up.  Drain the sink and use cool water to rinse all of the soap out.  Gently squeeze the excess water out and lay on a dry towel.  Gently (notice the repetitive use of "gently"?) roll the hat up with the towel, getting the rest of the water out.  Lay the piece out on another dry towel, and shape how you want it.  You can even use stainless safety pins to pin into place as it dries.

Chicken Cacciatore - ish

Autumn is here!  Time for pumpkin breads, pear tarts, cheesy foods, and soups/stews/crockpots.  Here is a chicken cacciatore recipe from Martha Stewart that I modified to fit what I had on hand.  It's fast and great for a week night, but is also an easy dish to cook on Sunday and then box up leftovers for the week.  I think it was even better the next day.
Original ingredients:
4 boneless skinless chicken breast halves
salt & pepper
1T olive oil
1lb mushrooms, trimmed and quartered
2 garlic cloves, minced
1 can (14.5oz) stewed tomatoes
1/4t dried oregano

My modifications:
- Chicken - I boiled the chicken breasts and cut into chunks.  Bone-on/skin-on would work as well.
- Mushrooms - I used a few generous handfuls of organic crimini mushrooms and then roughly chopped.
- I used italian stewed tomatoes and then omitted the dried oregano.  I also added some fresh tomatoes from the farmers market.
- I added zucchini and onions.  And more then 2 cloves of garlics.  Kale would be yummers too.
- I served with herbed mashed red potatoes, and topped with fresh cilantro and parmesan.  Parsley would be good, but Ken isn't a fan.

Instructions:
1) Cook the chicken.  The original instructions say to heat the oil in a skillet, and then add the chicken.  I boiled it.  You could also bake it, or go super easy and buy a pre-cooked rotisseries chicken.  Whatever, cook the chicken however you like, and then cut into smaller pieces.
2) While it's cooking, chop up all of the fresh veggies.
  3) In a saucepan, or in an awesome french oven like my hubby bought for me, heat up the oil.  Add the onions and garlic and saute until clear and fragrant.
 4) Add the mushrooms and zucchini and cook until softened.  Then add the tomatoes, and whatever spices you want.  Let it stew and bubble and fill the house with yummy smells.
 5) Add the chicken and any accumulated juices.  I know, doesn't that look awesome?
 6) Dish up some taters, some cacciatore, and top with cilantro and parmesan.  Mmmm...

Tuesday, September 7, 2010

Banana Bread!

Need a yummy whole-wheat, zero-butter banana bread recipe?  I have one for you!

There is one banana bread recipe in my cabinet that I use over and over again.  But, just like my home-made stock, I never make it quite the same way twice.  I used to follow it exactly, and it was very very yummy, but not necessarily the healthiest thing I could be eating.  Full of butter, sugar, and white flour.  Not that there is anything wrong with that.  Except that when I eat banana bread, I usually eat 4 or 5 slices in one sitting.  Usually.  Other times I will at almost an entire loaf in one day.  I needed something that had just as much "mmmm...", but a little less guilt.  I have several variations that I usually make, but here is my most recent version.

Ingredients:
- 4 or 5 large ripe bananas
- 4 eggs.  Lucky me, I get to use fresh brown eggs from backyard chickens!
- 1 c applesauce.  Again, lucky me, I get to use organic low-sugar applesauce that I canned last fall.
- 1 c sugar.  The recipe calls for 2c, but I added only 1c and it was still delish.
- 3.5 c flour.  I used whole wheat for this one.
- 2 tsp baking soda
- 1 tsp salt
- cinnamon to taste
- 1 tsp almond or vanilla extract
- 1 c ground pecans or walnuts or whatever kind of nuts you like
- handful of dried fruit.  I used dried cherries here.
- zest of 1 orange

Cooking:
300°F for 70 minutes or until firm to the touch.

1) Put bananas and eggs into blender and mix.
KIDDING Mom, I did actually crack the eggs.  I am much improved in the kitchen over the last few years!
2) Drink some wine.  Don't forget this very important and crucial step!
3) Pour into mixer.  The batter, not the wine.  Or mix by hand if you are less lazy than I.  Add the applesauce and sugar.  Mix well.  Then add the flour in small batches (mix, add, mix, add, etc.).  Add the extract, baking soda, cinnamon, and salt.  Mix again.

4) Add the nuts and dried fruit.
5) Add orange zest.
6) Mix on low speed until everything is nice and cohesive.
7) Lightly grease 2 loaf pans.  Fill with the batter.
8) Bake at 300 °F for 60-70 minutes.  I check at 60 minutes, but it usually needs another 10 minutes or so.  Remove from oven and let cool for about 10 minutes on a rack.  Then remove from the pans and let cool completely.  Or do like I do, and cut off a few pieces and consume immediately.  Mmmmm...

Saturday, September 4, 2010

Making Broth from Scratch

Has anyone noticed how dang expensive the boxes of store-bought broth/stock are getting?  Especially if you want the organic and/or low sodium kind.  Almost $4 for only 4 cups!  I love making soups, especially in the fall and winter, and every single time I use home-made stock the soup turns out a gazillion times better.  (For those not able to quantify "gazillion", it's a lot.)  Home-made is so much richer, flavorful, and not loaded with sodium and preservatives and all sorts of other diet and health saboteurs.  Sure, it's time consuming and sort of a hassle.  But if you make it on a day when you're home doing laundry, cleaning house, baking things, or [insert favorite back-aching chore here] it's really not that much extra time out of our crazy crazy schedules.  And it has the bonus effect of making me feel all Martha and competent in the kitchen.

I don't think I've ever made stock the same way twice, but here is the gist of it.

Ingredients:
- Meat bones of your choice.  I tend to save up all sorts of chicken bits in the freezer until I have time to make stock.  If you use the skin and such, your broth will be more oily/fatty.  I only do this on occasion.
- Something acidic, like lemon juice or lime juice.
- Garlic
- Onion
- Carrots or any other veggies (except for green veggies) that you want to add.
- Spices, if you like
- Water

Equipment:
- Stock/soup pot
- Strainer
- Containers for storing the stock

1) Fill a giant stock or soup pot with water.  Heat up and add bones/meat/skins.  Bring to a boil, then turn down the heat and let simmer for awhile.  Like 2 hours, or until you have a break from folding laundry or picking up after your family.  Stir occasionally.  I also add a couple tablespoons of lemon juice.  I read somewhere that it helps leach the minerals and good stuff from the bones.  I have no idea if it's true, but I figure it can't hurt.

2) Add in roughly chopped garlic.  I tend to like overly-garlicky foods, so I add about 6 cloves.  Add or subtract to your taste.  Also 2-3 yellow onions, roughly chopped as well (skins removed).  Again, add to suit your taste of flavoring.  I let simmer for a while longer.

3) Add in chunks of veggies.  For this batch I only added carrots.  Don't add celery or other green veggies until the last hour or so, because it will make your stock bitter.  Also add in the spices (pepper, salt, whatever you're into).  I usually don't add much other than pepper, because it really depends on what I'll be using the stock for.  I prefer to add it in when I'm using it for cooking.
4) Let simmer for another long while.  Sometimes I let it go overnight, or even through an entire weekend if I'm going to be home often enough to keep an eye on it.  Every so often, it will start to cook down and look like this.  Try not to let it get any more cooked down than this, because you will start to burn things.
5) Add water until it looks like this again.
6) Repeat as many times as you have time for.  The longer you let your stock simmer, the richer and yummier it will be.  Just don't forget to keep checking on it!  If you let it go overnight, make sure you are getting up every couple of hours to stir/add water.  It's a great project for insomniacs!

8) When you are ready to wrap things up, place a strainer over a separate pot or some other container.  Ladle or pour (I ladle, because I am clumsy) into the strainer in small amounts.  Use a wooden spoon to smoosh (LOVE that word!) all the juices through the strainer.  Dump the solids into the garbage.  Repeat until you're done straining all of the stock.
9) I let it sit and cool for awhile, and then skim the extra fat off the top.  Then I pre-measure it into tupperware and pop into the freezer until it's needed!

Saturday, August 21, 2010

Flower Pins

Last fall I purchased a couple of silk flower hair clips.  For like $7 a piece.  I used them in my hair, on the lapels of jackets, as a pin to hold the ends of my scarf together, and as a decoration on my purse.  And then it occurred to me that I can actually make these things myself.  For like $0.07 a pice.

Supplies:
- Fake flowers.  I like silk ones, but anything that isn't too stiff would work equally well.
- Hair clip or button pin thingy.  I've used about 5 different types, so play with some and see what you like best.
- Beads (for the center of the flower).
- Wire for attaching the flower to the clips.
- Felt for covering the back of the pin.

Tools:
- Hot glue gun and glue
- Scissors

Directions:
- Pull the fake flowers off the stems.
- Thread a bead onto a piece of wire and fold the wire in half (so that the bead stays on).
- Thread wire through the center of the flower petals.  Play with different color combinations and styles.
- Thread the wire around the pin or clip.  Different clips will require different methods of attaching.
- Cut the felt into small ovals or circles, in a size that will fit onto the back of the clip/pin.  I use zig-zag shears.
- Cut a slit in the felt to slide the clip through, and then place onto the clip.  So you have, in this order: bead, flower petals, clip/pin, felt.
- Hot-glue inbetween the flower and felt, which will then secure the clip in between the two.
- Let dry and now you have a beautiful, and cheap, flower pin!

Here's my Mom wearing one of my creations on her dress for my brother's wedding:

Friday, August 20, 2010

Framed Jewelry Holder

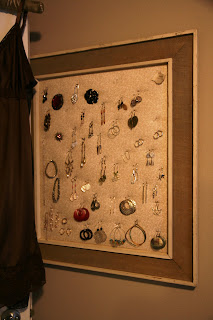
I am blessed with lots of cute earrings, but plagued with no good organizing system for them. So I crafted this awesome jewelry holder from an old picture frame and a few supplies from the local craft store.  I love it so much that I got up in the middle of the night and turned the light on just to look at it again.  But I'm neurotic like that.

Purchased supplies:
Picture frame (minus the glass) - $15 at my local antique shop
Foam board - $3
Batting - $4
Fabric - $3
Push pins - $3
Total cost = $28 (with batting, fabric, and pins left over)

Other tools you'll need:
Scissors
Hot glue gun, glue
Something to secure the board to the frame
Lots of cute earrings to hang up!

Steps:
1) Remove glass and backing board from your frame.
2) Cut the foam board to fit inside the frame.  Leave a little extra space to account for the batting and fabric that will be wrapped around the edges.

3) Cut the batting and fabric to the size of the foam board, leaving 1-2 inches around the edges.  Washing and ironing the fabric gives the best results, but I'm lazy, so I just ironed it.
4) Starting with one edge at a time, hot glue the batting and fabric to the edges of the foam board.  Make sure you have the fabric facing the correct direction.  Not that I've ever done it wrong...
5) Admire your work.
6) Place the covered board inside the frame.  Secure it to the frame.  My piece was old and didn't have any clasps on the back that most modern-day frames come with.  So I used a handful of screws to keep it in place.
7) Admire your work again.
8) Hang on the wall.  Push the pins randomly on the board and hang up your beautiful jewelry.  Voila!